Mix Paint With Drywall Mud: Pros and Cons
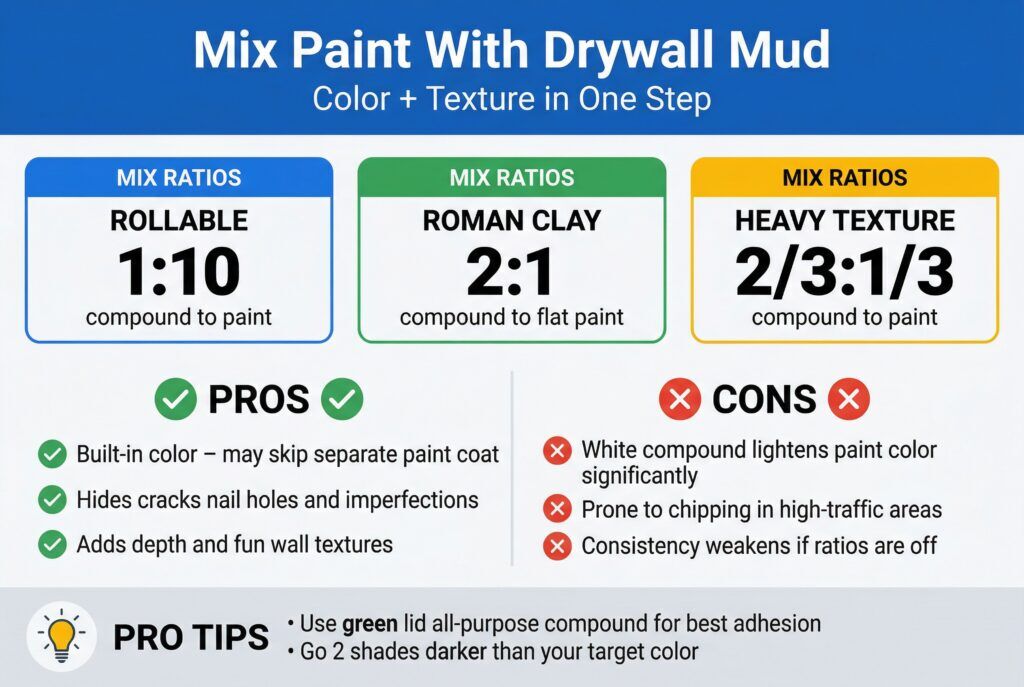
Mixing drywall compound with paint creates a textured, color-integrated wall coating that covers cracks, nail holes, and uneven patches without a separate paint layer. To mix drywall compound for a rollable coat, combine one part compound with ten parts paint; to mix drywall compound for a faux Roman Clay finish, use two parts compound to one part flat interior paint. White joint compound lightens any paint color significantly, so choose a darker shade than your intended result.
This technique turns drywall mud into a surprisingly versatile tool for creating fun wall textures throughout your home, and once you try it, standard painting feels like the boring option.
Key Takeaways
- Mixing drywall compound with paint creates built-in color that can eliminate the need for a separate paint coat.
- White joint compound lightens your paint color more than you’d guess, so always choose a darker shade than your target.
- The mixture is prone to chipping in high-traffic areas, making it a better fit for accent walls.
- All-purpose joint compound with a green lid offers stronger adhesion, thanks to its higher glue content.
- Spackling is designed for small holes and spot repairs; joint compound is the right choice for texture work and larger wall repairs.
- Drywall compound can be applied to canvas for art, making it a popular medium for DIY artwork and fun wall textures beyond walls.
What You Need
Choosing your Compound
Drywall compound and joint compound refer to the same material. You’ll find it in two main forms: pre-mixed compound comes ready to use from the container, making it convenient for most projects, and powdered compound lets you control the consistency as you mix. All-purpose joint compound with a green lid is the best choice for texture work; its higher glue content provides added adhesion to drywall surfaces. Avoid chalk-type spackling compounds for texture work, as they don’t give you the flexibility and working time that drywall compound does. Tinted drywall mud is particularly helpful because it makes repairs easy to spot on covered wall surfaces, making touch-ups more accurate. Mixing paint into the compound can also enhance the visual appeal of the finished surface.
Spackling vs Joint Compound
If you’re wondering whether to use spackling or joint compound, the answer depends on the scope of the job. Once you decide which product fits the job, the process moves quickly. Spackling works best for small repairs: nail holes, shallow dings, and minor surface damage on your walls. Spackling dries harder and shrinks less than drywall compound, but it doesn’t spread well across larger areas. Joint compound is the better tool for texture work, making fun wall textures, and covering larger wall areas.
Tools and Surface Prep
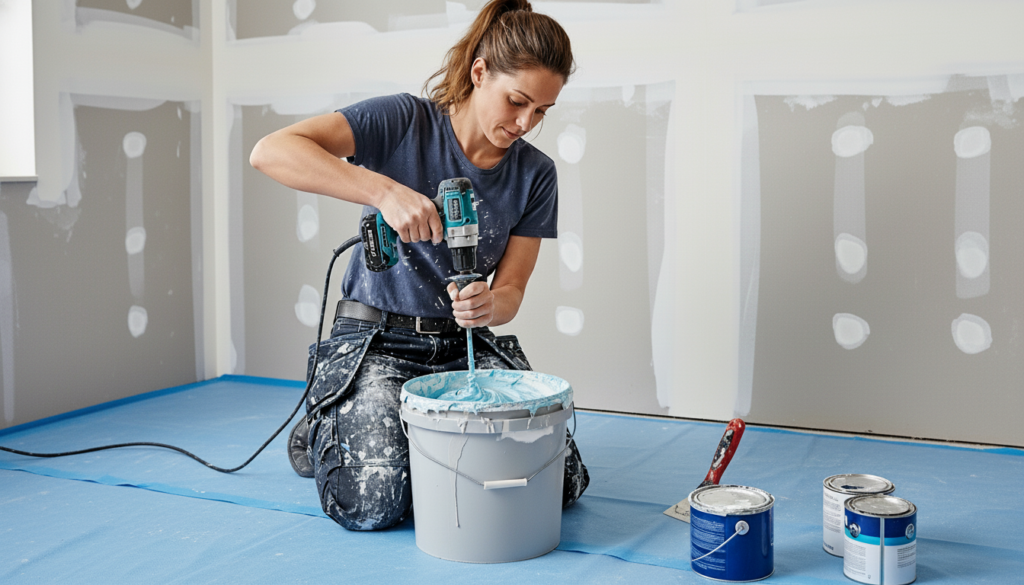
For tools, you’ll need a drill with a mixing paddle. Hand-mixing is possible, but a paddle gives you a lump-free result with less effort. Have a trowel ready for heavier applications, a sponge for stippling, and a roller for large wall sections. Protect your floors with canvas drop cloths, clean your walls thoroughly, and prime first for the best bond. Scrape away any loose material from old repairs, then scrape again lightly to smooth the edge, which makes the surface easy to prime and gives the mixture a clean base. Post a photo of your prep work in the comments if you’d like feedback before moving on.
How To Mix And Apply
Step 1: Choose your ratio. The right ratio depends on the texture and finish you’re after. For a rollable coat, use one part compound to ten parts paint, creating a pancake batter consistency that rolls smoothly. For heavy texture work, shift to two-thirds compound and one-third paint. For a faux Roman Clay finish, combine two parts drywall compound with one part flat or matte interior paint; that ratio creates a layered, plaster-like effect, making a separate prime-and-paint step unnecessary. Heavy texture applications work especially well on accent walls and feature areas.
 Mixing paint with drywall mud tips
Step 2: Mix the compound. Add the drywall compound slowly while mixing, and keep going until the mixture reaches a yogurt-like consistency with no lumps. Note that a drill with a mixing paddle gives you the most consistent result, making sure every batch is creamy and free of air bubbles. Mix drywall compound in small batches at first to get a feel for the consistency before committing to larger amounts.
Step 3: Choose a darker paint color. White drywall compound lightens paint color more than you’d guess, so choose a darker paint color than your intended result. If you’re starting with white paint as your base, go at least two shades darker than your target. Measure carefully each time you mix drywall compound with paint, as making consistent batches is key to matching color across your walls. Added consistency in color comes from using the same ratio each time you mix.
Step 4: Test first. Test your mud mixture in a corner before committing to entire walls. Keep in mind that drywall compound takes a couple of days to dry fully in a closed room, so plan accordingly. Open the windows to speed up drying and help each coat set evenly. Open air circulation makes a noticeable difference in drying time.
Step 5: Apply to large sections. Roll large sections in overlapping passes with steady pressure, keeping wet edges to avoid visible seams. Depending on the look you wanted, you can build up coats gradually or work in one heavier pass.
Step 6: Add texture. For added texture, work a taping knife in an “X” or “S” pattern across the surface. Sponges, palette knives, and brushes each produce different fun wall textures: orange peel, stipples, swirls, and freeform designs. Vary your tools and mud thickness to hit the overall look you wanted. People often throw a coat of compound over a dried base layer to create fun wall textures with even more depth and dimension.
Pros And Cons
| Pros | Cons |
| Creates built-in color; may eliminate a separate paint coat | White compound lightens paint color, so choose darker shades |
| Hides cracks, nail holes, and wall imperfections | Prone to chipping in high-traffic areas |
| Adds depth and fun wall textures to any room | Consistency weakens if mixing ratios are off |
| Tinted drywall mud shows clearly where it has been applied | Areas without mud coverage may need added paint coats |
Mixing drywall mud with paint is also popular as an art medium. Many people throw a coat of drywall compound onto canvas as a fun way to build layered, textured art pieces with added depth. The compound works on wood panels too, making it a versatile material for DIY artwork and mixed-media art projects. Palette knives produce bold, sculptural artwork; sponges create softer art designs. Each art piece benefits from multiple thin coats to build up depth and dimension. Once the drywall compound dries, you can paint over it for a finished art piece with rich, tactile texture. Post a photo of your canvas art in the comments. It’s always fun to see the creative designs people come up with.
Fixes And Tips
Adjusting your Mixture
If your drywall mud mixture is a bit too thick, add water a small amount at a time while mixing. If it’s a bit too thin, add more drywall compound. Limit how much water you add at once, as too much weakens the mixture. Note that hard-set compound in the container is a sign the mix dried out; open the container and stir in a small amount of water to revive it.
Drying and Sanding
Note that cracking usually happens when the mud goes on too thick or dries too fast. Let each coat dry fully before adding the next layer, a couple of days in a closed room is normal, so keep that in mind when planning your project timeline. Open the windows to speed up drying, then sand any rough spots smooth with fine-grit sandpaper, making sure to work gently; light sanding won’t damage the paper backing on drywall, but aggressive sanding will.
Touch-ups and Repairs
For small touch-ups, spackling is often the faster option for holes and dings. For repairs making up part of a textured wall, mix a small batch of drywall compound with leftover paint, sand the spot smooth first, then apply. Use the same drywall compound ratio as the original coat so the repaired area blends in. A sealer coat offers added protection and makes future cleaning easier.
Conclusion
Mixing paint with drywall mud is a rewarding DIY project, but textured applications use more material and take more time than standard painting. Some jobs are better handled by experienced contractors, especially when you want fun wall textures that stay consistent from wall to wall. Post your project details or questions in the comments below; we read every reply. For large projects, OnDemand Painters has the tools and experience to ensure consistent results across your space.
FAQs
Can I use any type of joint compound for mixing with paint?
Use standard all-purpose joint compound for best results. Avoid fast-setting compounds as they dry too quickly for texture work.
How do I know if I’ll achieve my desired outcome with the texture mixture?
Test your mixture on a small section first and let it dry completely to evaluate the texture depth and color before applying to entire walls.
Should I remove wallpaper glue before applying the paint and joint compound mixture?
Yes, remove all wallpaper glue residue first. Any remaining glue can prevent proper adhesion and cause peeling or uneven texture.
What is the difference between spackling and joint compound?
Spackling is designed for small holes and spot repairs on walls; joint compound is the right tool for texture work, seam taping, and larger repairs. Spackling dries harder with less shrinkage, but joint compound spreads more easily and gives you more working time.
How thick should I apply the mixture on my walls?
Apply thin, even coats rather than thick applications. Multiple thin layers provide better adhesion and reduce cracking risk.
Can I use this technique on ceiling surfaces as well as walls?
Yes, but ceiling application requires more skill due to gravity. Work in smaller sections and use slightly thicker consistency to prevent dripping.
Can I use drywall compound on canvas to create art?
Yes. Drywall compound applied to canvas creates textured art pieces with real depth and dimension. Mix drywall compound with paint first, then apply to a stretched canvas using palette knives or sponges for different texture effects. Thanks to its flexibility, drywall compound is a fun and affordable medium for all kinds of DIY art projects.

Chris Heerdegen
Chris Heerdegen is the founder and owner of OnDemand Painters, a painting and finishing company serving six metro markets across the Midwest and Florida. With over 20 years in the industry since 2001, Chris built OnDemand around a simple idea: answer the phone, show up when you say you will, and do the kind of work that earns a review.
All Posts